Summer Ice Cream Sign Idea – By: Bee Inspired with Carol

By: Carol from Bee Inspired with Carol

Create a fun and festive summer ice cream sign for your home with this easy DIY tutorial. You too can make your home feel like a summer paradise with this easy and fun ice cream sundae sign

DIY SUMMER ICE CREAM SIGN

Ice cream cones just scream SUMMER! And man oh man, am I ready for summer to come. The sun, the fun, and of course, the ICE CREAM. That sweet little treat is something I am desperately needing in my life at this time. I know you have to feel the same way, right y’all? 

This DIY Summer Home Decor is so sweet and simple. It is the perfect addition to your mantle next to a pretty vase of bright-colored flowers. It would even look fabulous on your kitchen counter by your decorative cutting boards.

 It would even look great on your bookshelf or front entryway with a tall sea-scented candle. And maybe even during those summer months, you could turn your coffee bar into an ice cream sundae bar! Did that go too far? I think not! Honestly, there is no wrong place to put this summer sign in your home because it is so stinking great. 

So let’s get started making one of these super customizable and unique DIY Wooden Signs! Are you as excited as I am about it?

SUPPLIES NEEDED TO MAKE YOUR SUMMER ICE CREAM SIGN:

  • Woodpile Sign from Hobby Lobby – 18” long
  • Cardstock Paper – 65 lb. at least
  • Ice Cream Cones
  • Folk Art White Chalk Paint
  • Summer Vibe Scrapbook Paper
  • Handy Art Designer’s Palette Modeling Paste
  • Anita’s Acrylic paint – Wasabi, Yellow, Pink Parfait, Turquoise
  • Wooden Letters – S U M M E R
  • Gold Glitter or Faux Sprinkles – Etsy
  • Mod Podge
  • Scissors
  • Sanding Sponge
  • Paintbrushes
  • Hot glue
  • Baby Wipes
  • Puppy Pads

Steps:

1 – Be sure to download your FREE Summer Vibe Scrapbook Paper digital prints on cardstock. Tip* This helps to ensure that your ink doesn’t bleed.  

2 – Grab your 18” wood sign and apply a base coat of white paint. Be sure to cover the entire board. Tip* You can choose any color of paint for the base of your sign you want. Do whatever works best to fit your home decor. 


3 –  Set aside to dry. 

4 – With your 6 wooden ice cream cones, determine which digital summer vibe scrapbook paper you want to use to decorate your cone sections. Lay paper down flat – design underneath so it is not shown. Cut out a square template piece to use as a guide to cut 6 squares. Tip* I used 3 different sheets from my summer bundle. With 2 cutouts of each design.  

5 – Place some Mod Podge on the cone of your wooden ice cream cone. Tip* Be sure to go to your edges to make sure you have a nice crisp line. Only apply the mod podge to the wood. You will not want to add a layer on top of your paper to seal it, because it will cause the ink to bleed for sure. And since this is an inside sign, there is no need to seal. 

6 – Apply your square shape cut out of scrapbook paper right on top of your Mod Podge covered cone. 

7 – With your scissors, cut along the edge of your cone to remove your excess paper.

8 – Grab your sanding sponge and remove any excess along the edges. Tip* Make sure your paper is not wet or damp or it will tear!

9 – Next grab your modeling paste and scoop out 3 different globs. Place onto a palette or even a plastic plate. Tip* You can use colored Puffy Paint instead if you already have that in your craft stash. 

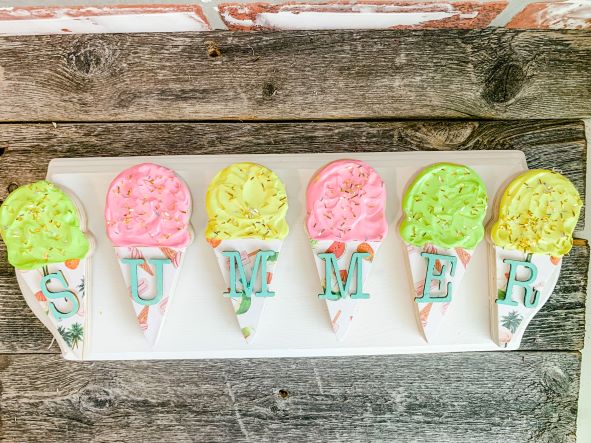
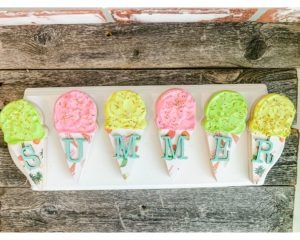
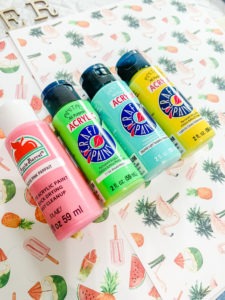
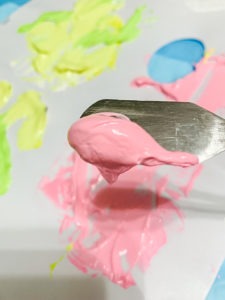
10 – Next determine the color of acrylic paint you want that matches your scrapbook paper. I used Wasabi, Yellow, and Pink Parfait. With a palette knife, mix one color of paint into one of your globs of modeling paste. Repeat for all of your globs. Mix it up so it looks a bit like frosting. The bright colors will dull down a bit once mixed together. Tip* Don’t lick your palette knife. 😉  

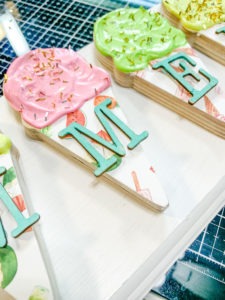
11 – With your palette knife, start to add your “frosting” like modeling paste to your ice cream scoop section. Be sure to go all the way to the edges to give it a complete, textured, realistic look. Tip* This will take some time to dry since the modeling paste is a little thicker than other mediums we have used in the past. Possibly even 2-3 days, so be patient.  Repeat with all of your 6 ice cream cones, creating 2 yellow, 2 green, and 2 pink ice cream cones. 

12 – You can skip this next, but I think the added letters of SUMMER are so much fun. With a small paintbrush, apply a coat of turquoise paint to make your letters really pop. Tip* You decide what color paint works best for your style. Also, you could spell out any word instead. Like Sweet or fun. You decide and have fun through the whole process! Be sure to dry with a heat gun.

13 – To add some sprinkles, grab your gold glitter or even your Faux Sprinkles you found on Etsy and add it to your not dry modeling paste. Add as much or as little as you want. You could even skip this step entirely. 

14 – Determine the layout of your cone colors and papers before finalizing with glued additions. With your glue gun, add your dry wooden letters to your cones. 

15 – Next add your cones with your glue gun to your painted wood sign. Pay attention to your spacing as you work. 

16 – Once completely dry, decide where in the world you are going to place this adorable DIY Summer wooden sign! This is the hardest part. 

You guys have you ever just had an idea that you loooooove so much ever since it popped into your brain? And you just can’t wait to find the time to make it! And then there are so many things that pop up to keep you from making the sign… ugh!!!! Well, this SUPER CUTE Summer Ice Cream Sign was that idea for me. 

Thank goodness I was finally able to make it become a reality because it was SO MUCH FUN. I am so glad I could share it just in time for you to start transitioning your home decor to that sweet summer style that we all love! 


I am so glad you were here to get excited about summer with me and make something cute too!

Leave a Reply